| |
The Viennese Action
How to Remove and Regulate the Action
by Edward E. Swenson
Remove the key slip by pushing it to the left (sometimes to the right) into the spring which holds it in place. Slightly bow the slip outward in the middle. It will slide out of the mortise at the treble (or bass) end and can be removed.
Make sure all the hammers are in rest position. Use a flashlight to be sure. Slowly pull the action forward making sure not to depress any of the keys. Pull the action evenly using the little brass knobs which may be present on the key blocks. Be absolutely certain none of keys are depressed. As the rear of the action slides down off the risers in the back of the keybed, control the movement so that the action does not fall with a thud. If the action falls suddenly the hammers will bounce upward, snag on the pinblock, and snap off when the action is pulled forward. If you are uncertain as the action drops, push it back in place and start over.If you are certain all the hammers are in rest position, slowly pull the action forward and remove it from the piano.
The term Viennese or Prellmechanik refers to the type of fortepiano action used, and possibly invented, by Johann Andreas Stein (1728-1792) in Augsburg, Germany around the year 1770. The success of Stein's pianos was due to excellent craftsmanship and to new and improved parts in the action. Stein used the Viennese hopper, or Prellmechanik (escapement) action, which was similar to Silbermann's. However, a distinctive feature of Stein's instruments was the innovation (whether or not he invented it is uncertain) of replacing the stationary rail with individual spring-loaded excapement levers, one for each key. (Mary Louise Boehm. Stein Family. Encyclopedia of the Piano, p. 372). Stein's daughter, the piano builder Nannette Stein (1769-1833) and her husband, Johann Andreas Streicher (1728-1792), moved the workshop to Vienna in 1795. Nannette's father trained her from early on in the affairs of his business, so that on his death she continued it together with her brother Matthäus Andreas. Nannette and her brother worked together from 1796 to 1802, when he severed the partnership and started his own business. Streicher, who up to then had handled the commercial side of the business, now took his full share of the work. The firm became highly successful and their instruments were played by celebrated pianists throughout Europe. Nannette was an energetic businesswoman, an excellent pianist, a model wife and mother. Socially she became prominent because of her ability to befriend important people, including Beethoven, with whom the Streichers were particularly close...After 1825, Nannette Stein was in partnership with her son Johann Baptist Streicher (1795-1871), and the Streicher firm became famous for the finest pianofortes. (Ibid., p. 373-74). The Viennese piano builder Anton Walter (1752-1826) departed from Stein's action by including the use of longer and larger hammers, a check rail, a moveable rail to adjust the escapement, and brass capsules, which were easier to regulate and allowed a freer hammer pivot. Walter's innovations were adopted by most of his contemporaries and by later generations of Viennese builders, including Johann Schantz and Conrad Graf. Regulating Walter-type action is the focus of this brief introduction to regulating the Viennese action. The Viennese action is characterized by hammers which are attached directly to the key, hinged in a fork called a capsule. The hammer head points toward rather than away from the player, allowing the escapement and the back of the key to be located under the protruding edge of the soundboard.
The Viennese action was used by Austrian and South German piano builders from circa 1770 until around World War I. During its hey-day Vienna boasted enormous activity in piano building: In 1770 there were only 11 organ and piano builders. There were 29 builders in 1791, the year Mozart died, but by the year 1850 there were 214 piano builders active in Vienna alone, and the number remained constant at around 200 until the beginning of the 20th century. Some of the most famous composers of piano music, including Mozart, Haydn, Beethoven, Schubert, Chopin, Brahms, and even Franz Liszt played either exclusively or frequently on instruments equipped with Viennese actions. Boesendorfer supplied grand pianos with either Viennese or English actions until 1909 and the Viennese action continued to be manufactured by some small builders even after World War I. The late Viennese action was heavy, lacking double escapement, and was largely considered obsolete by progressive builders in the late 19th century. The economic depression and the fall of the Austro-Hungarian monarchy after World War I led to the gradual dissolution of the once thriving Austrian pianomaking tradition. Today, only the Boesendorfer company remains.
General Elements of Regulating
Required tools and Materials:
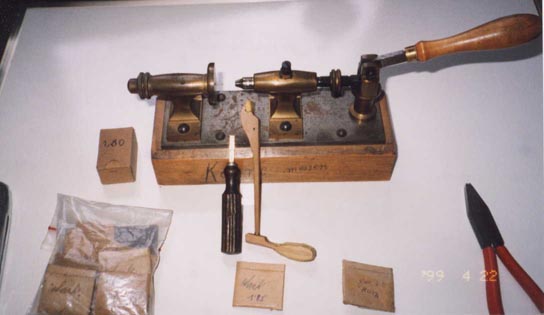
Capsule expanding pliers, fine lubricating oil, a thin strip of wood covered with soft leather, several pieces of end grain soft wood, strips of thin parchment, strips of beak leather (sämisch Hirsch, trangegerbt) ["chamois stag leather not completely tanned through." ], and hammer leather of various types. Dry Lube for squeaking beaks and powdered teflon for the keybed.
Note: Because the hammer is attached directly to the key, it is essential that both front and balance rail bushings be in perfect condition. Wobble in the key will also cause the hammer strike position to change. A big difference between the Viennese and English action is the fact that the hammer pivot point in the English is fixed by having the hammer flanges screwed to a rail. In the Viennese action the pivot point, in a fork (capsule) mounted on the key, is always in motion.
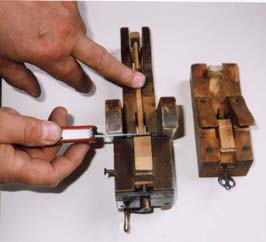
- Remove the hammers from their brass capsules by inserting the capsule pliers from above and slightly expanding the fork of the capsule. Number and arrange the hammers on a tray. If they are already numbered, make sure they are in the original order.
- Check the condition of the beak leather and the escapement lever parchment hinges. Replace as required. Remove bad parchment hinges by soaking the bottom of the escapement lever in hot water. Take care not to damage the kerf in the escapement lever. Wait until the water has dissolved the glue and gently push out the remains of the old parchment with a scalpel. After removing the parchment, put a piece of wax paper in the open kerf in the escapment until the wood is completely dry.
- Check the condition of the hammer rest pads, balance and front rail felt punchings and back rail cloth. The thickness of the back rail cloth is critical as it controls the relationship between the beak leather and the escapement. If the back rail cloth or hammer rest pads need to be replaced, make them exactly like the originals using layers of cloth instead of felt blocks. Be certain to duplicate the original thickness of the back rail cloth and rest pads.
- Clean corrosion from the rail pins. Clean the keyframe and action.
- On very old instruments which have not been played for many years, a lump of corrosion may have built up on the escapement springs. If the springs are still in good condition, they can be gently cleaned. It may be necessary to replace the spring using spring brass of the same diameter.
- Gently clean the hammer leather by brushing with a soft brush. If the hammer leather needs to be replaced, cut off only the top layer of leather, and measure the thicknesses throughout the scale with a spring-loaded micrometer. Cut new strips of comparable deerskin so that the stretch is side to side. Arrange the new leather in piles according to thickness. The leather should be cut wider than the hammerhead and then trimmed after installation. Using hot hide glue, glue one side of the new leather to the hammer. The glue should be rather thick for an instantaneous bond. Being careful not to get glue under the strike point, stretch the leather across the hammer, trim for length and glue in place. The leather should be glued tightly to the hammer shoulders, but never glue the hammer leather at the hammer crown. When the glue is dry, excess leather should be cut from the sides with curved scissors or a sharp knife.
Lubricating
Use teflon powder for the keybed, the risers which elevate the action in the rear of the keybed, the damper rods, and the damper case.
Dry lube (powdered mica) can be used on the beak leather if it begins to squeak.
Regulation Requirements
These comments are obviously general and will not apply precisely to every Viennese action during the 150-year history of the mechanism. The author welcomes suggestions and comments.
- A perfectly level keyboard
- Leather key bushings which allow free travel up and down, but no wobble.
- Perfect beak leather which projects slightly from the hammer shank tail and is centered under the escapement. The Viennese used a special jig which insured that the distance between the end of the beak leather and the hammershank axel was exactly the same for each hammershank.
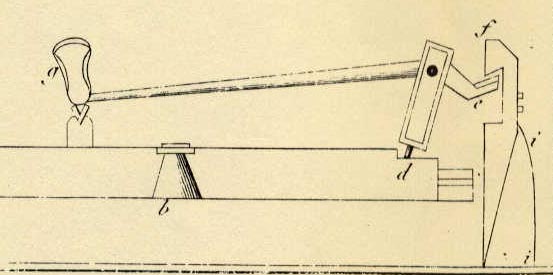
- When the key is at rest there should be minimal space between the beak leather and the escapement. (The period drawing of the Graf action shows no space between the beak leather and the escapement. The drawing of Nannette Stein's action from 1801 shows a slight gap.) The beak leather must slip smoothly and immediately under the escapement lever when the hammer returns to rest position.
- The hammers should fall in a smooth gliding motion, neither too fast nor too slow.
- When the hammer escapes at 2 mm from the string the key should be fully depressed. Hence the action is regulated without the aftertouch typical in the English action. It should not take additional finger pressure to achieve escapement when maximum key dip is reached. [The only exception to this is in the high treble, where regulators in Vienna often use a slightly shallower key dip and some finger pressure is needed to achieve escapement.]
- There can be several causes if a strong blow results in a weak tone: The beak leather may be loose and require regluing; the beak leather may be bending because it is worn and has lost its firmness, or the escapement spring tension may be too weak. Any adjustment of spring tension will also change the let-off.
- The hammer should check at the highest possible point, but it must not rub or catch on the check when ascending.
- The damper lift should begin at about half key dip.
- The action should be completely free of extraneous noises.
- The damper function, particularly with leather dampers, should be instantaneous and complete. (So lang der Finger auf der Taste liegen bleibt, dauert der Ton fort, weil der Dämpfer dadurch von der Saite weggehoben wird, und sie frey vibriren lässt:zieht sich der Finger von der Taste zurück, so verschwindet auch plötzlich der Ton, weil der Dämpfer wieder auf die Saite fällt, und dadurch ihre Schwingung hindert. Andreas Streicher. Kurze Bemerkungen über das Spielen, Stimmen und Erhalten der Fortepiano welche von Nannette Streicher, geborne Stein in Wien verfertiget werden. Vienna, 1801, p. 5) Leather dampers over pearwood cores, must be replicated if thy are worn or missing. Never replace leather dampers with modern felt.
- Viennese fortepianos may have from two to six pedals. They should all be silent in function and perfectly regulated. In a fortepiano with six pedals, the pedals usually have the following functions:
- keyboard shift (often all the way to una corda)
- bassoon
- damper lift
- single moderator
- double moderator
- Janissary pedal (drums, bells, triangle)
Lubricating and Adjusting the Capsules.
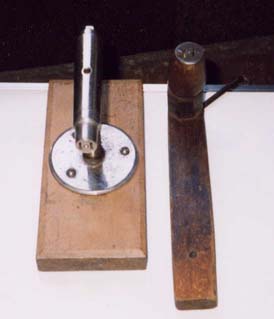
Remove the hammers from the capsules with a expanding pliers. Clean rust and corrosion from the axle pins by revolving the pins into the end grain of a piece of soft pine. In the field, period technicians often used the end grain at the rear of the key to clean the axel pins. Historical instruments often have small holes in the ends of the keys. Clean the dimples in the brass capsules with a toothbrush with the bristles cut to the nub. Clean dust from the capsules with a piece of soft leather glued to a thin board. With a thin wire, lubricate the capsule dimples with a tiny drop of watch-maker's oil. (The traditional lubricant was probably thinned olive oil.) Lightly squeeze the capsule together. Open the capsule from above with expanding pliers. Fit the hammer shank axles into the dimples in the capsule (put the key under your arm while performing this work.) A special machine was developed by Viennese builders to turn new capsules into the keys without damaging the forks. An ingenious press was used to insert the axel pins(Kerne) into the hammershanks.
Check the capsule tension.
Hold the hammer end of the key upright at about 45 degrees. Lift and drop the hammer onto its rest pad. When the correct capsule tension is achieved the hammer should bounce two to three times on its rest pad. The capsule tension is too loose if the capsule rattles or if the hammer bounces more than three times. Check for a loose capsule by lightly holding the hammershank onto its rest cushion. Knock on the key. If the capsule tension is insufficient the axle will rattle in the capsule. The hammer must be removed from the capsule to adjust capsule tension. The sequence is always the same: remove the hammer, squeeze the capsule lightly, open the capsule gently with the pliers (just enough to place the axle in place), and check the capsule tension. The swing test is absolutely critical for a careful regulation. The capsule tension must be regulated to the size and weight of the hammers, as the hammers progress from large, heavy hammers in the bass to light hammers in the treble.
The beak leather must be tightly glued with hide glue to the hammerbutt. Make sure there is no glue on the end of the beak leather or it will knock against the escapement. If the leather is loose it will flex against the escapement lever and repetition will be poor. The beak leather should stick out a bit from the hammer shank and should have minimal space (lost motion) under the escapement lever. There should be just enough lost motion so that, when one releases the key slowly, there is space for the beak to slip back under the escapement lever.
The hammers must rise absolutely perpendicularly and should not let off closer than 2 mm from the strings. The hammers must not block against the strings. On early Viennese actions, the fine let-off is regulated by slightly adjusting the tension of the escapement spring. Later instruments have let-off screws which help adjust the distance between the beak and the escapement lever.
When the hammer has reached its highest point, the deepest point of the key dip should also have been reached so that there is no aftertouch. Extra pressure should not be necessary to make the hammer escape when the key is depressed slowly. On some later Viennese actions with heavy hammers, I often use an aftertouch of about .010". Remember the key dip is controlled at the rear of the key on the Viennese action. The dip is regulated by gluing and removing shims to the upper surface at the rear of the keys.
Check the action with a strong blow to make sure that the instrument plays and that the beak does not simply slip away from the escapement without making any sound. If this occurs, check for loose beak leather or worn beaks. The escapement spring tension may also need to be slightly increased by pressing it forward lightly at its base. (You must remove the rail which protects the springs and the escapement levers when doing spring adjustments). Increasing spring tension will also change the let-off of the hammer.
The check rail must not catch the hammer on its way up. The hammers must strike the unison squarely and must show even spacing in rest position. To repair an oinking or ringing damper, the offending damper can be brushed lightly with a soft brush. Parchment or soft leather shims can be inserted between the pear-wood molding of the damper and the damper leather. With the damper at rest on the unison, pluck the strings to locate ones that ring and regulate according to the above description . Damper lift on early Viennese actions begins almost as soon as the key is depressed. On later actions the damper lift begins at half key dip.
|
|
|

 English

